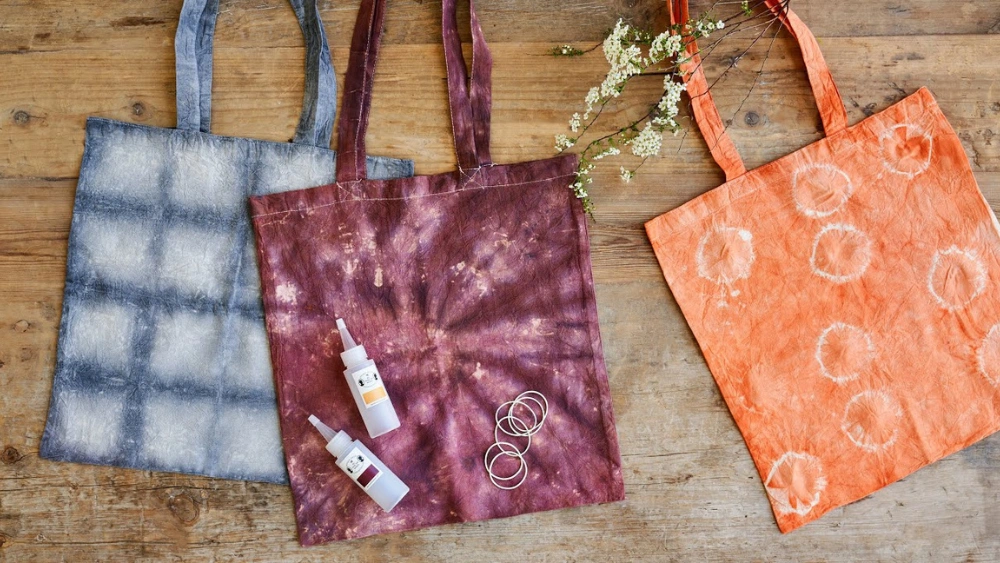
Are you ready to turn a plain tote bag into a colorful, eye-catching accessory? Learning how to tie dye a tote bag is easier than you think, and it’s a fun way to express your creativity.
Imagine carrying a bag that’s uniquely yours, bursting with vibrant patterns and colors. In this guide, you’ll discover simple steps to create stunning tie dye designs that will make your tote stand out everywhere you go. Let’s dive in and bring your tote bag to life with bright, beautiful colors!

Credit: www.hobbycraft.co.uk
Materials Needed
Tie dyeing a tote bag is a fun and creative project. You will need some basic materials to get started. These materials help you create colorful and unique designs.
Gather the right supplies before you begin. This guide covers choosing the tote bag, picking dye colors, and other helpful items.
Choosing The Right Tote Bag
Pick a tote bag made of natural fibers like cotton. Natural fabrics absorb dye better and show vibrant colors. Avoid bags with synthetic materials or coatings.
Selecting Dye Colors
- Choose bright colors for bold designs.
- Pick colors that blend well together.
- Use fiber-reactive dyes for best results on cotton.
- Start with two or three colors for easy mixing.
Additional Supplies
| Supply | Purpose |
|---|---|
| Rubber bands | To bind and create patterns on the bag |
| Plastic squeeze bottles | For applying dye precisely |
| Plastic gloves | To protect your hands from staining |
| Plastic table cover | To protect your work surface |
| Water bucket | For rinsing the bag after dyeing |
| Plastic bags | To wrap the bag while dye sets |

Credit: www.bakerross.co.uk
Preparing The Tote Bag
Before you start tie dyeing, it is important to prepare your tote bag properly. This helps the dye stick well and gives you bright colors.
Taking time to get ready makes your project easier and more fun. Let’s look at how to prepare the tote bag.
Pre-washing Tips
Wash your tote bag before dyeing it. This removes dirt and chemicals that block the dye.
Use a mild detergent and cold water. Do not use fabric softener because it can stop the dye from soaking in.
- Wash with similar colors
- Use cold water to protect fabric
- Skip fabric softener
- Dry completely before dyeing
Setting Up Your Workspace
Choose a space that is easy to clean and has good air flow. Tie dye can be messy, so protect your area well.
Gather all your supplies before you start. This keeps your work smooth and helps you stay organized.
- Cover surfaces with plastic or old newspapers
- Wear gloves to protect your hands
- Have paper towels ready for spills
- Keep dye bottles and water nearby
Basic Tie Dye Techniques
Tie dye is a fun way to add color to plain tote bags. It uses folds and twists to create patterns.
Each technique changes how the dye touches the fabric. You can make many cool designs with simple steps.
Spiral Pattern
To make a spiral pattern, start by pinching the center of your tote bag. Twist it around until the whole bag forms a flat spiral shape.
Use rubber bands to hold the spiral in place. Apply different dye colors on each section between the bands. This creates a bright, swirled look.
- Pinch center of bag
- Twist into flat spiral
- Secure with rubber bands
- Apply dye in sections
- Let dry before removing bands
Bullseye Design
For the bullseye design, pinch the fabric where you want the center circle. Pull the fabric up into a cone shape.
Place rubber bands at intervals down the cone to create rings. Apply different dye colors to each ring. The result looks like colorful circles.
- Pinch fabric center
- Pull into cone shape
- Add rubber bands along cone
- Dye each section with color
- Wait to dry and remove bands
Stripes And Crumples
Stripes are easy to make by folding the tote bag like a fan. Fold it back and forth in straight lines.
Use rubber bands to hold the folds. Add dye in stripes or sections. Crumple designs are made by bunching the fabric randomly and tying it.
- Fold bag like a fan for stripes
- Use rubber bands to secure folds
- Dye each stripe or section
- For crumples, bunch fabric randomly
- Tie with bands and apply dye

Credit: www.hobbycraft.co.uk
Applying The Dye
Applying dye to your tote bag is the fun part of tie-dyeing. It brings your folded and tied fabric to life with bright colors. You need to apply the dye carefully for the best patterns.
Make sure your workspace is covered and wear gloves to protect your hands. Use squeeze bottles or spray bottles for more control over the dye placement.
Folding And Tying Methods
How you fold and tie your tote bag affects the final look. Different techniques create different patterns. You can try spirals, stripes, or crumples.
- Spiral:Pinch the center and twist into a tight spiral. Tie with rubber bands to hold shape.
- Accordion Fold:Fold the bag back and forth like a fan. Secure with bands or string.
- Crumple:Scrunch the fabric randomly. Tie loosely to keep the shape.
Dye Application Tips
Applying dye evenly helps the colors stay bright and clear. Avoid soaking the fabric too much to keep colors from blending too much.
| Tip | Why It Helps |
| Apply dye to both sides | Ensures full color coverage |
| Use small amounts of dye | Prevents colors from running |
| Work in sections | Controls color placement |
| Keep tied areas tight | Creates clear white lines |
Using Multiple Colors
Using more than one color adds depth and interest to your tote bag. Plan your colors to avoid muddy results where they meet.
- Choose colors that blend well, like blue and green.
- Apply one color at a time and let it soak a bit.
- Leave small gaps between colors to keep them separate.
- Use plastic wrap to cover the dyed bag while it sets.
Setting The Dye
Setting the dye is a key step in tie-dying a tote bag. It helps the colors stay bright and long-lasting.
Follow these steps to ensure the dye sets properly on your fabric. This will make your tote bag look vibrant and colorful.
Waiting Time
After applying the dye, you need to let the tote bag sit. This waiting period is crucial for the dye to set correctly.
Leave the tote bag for at least 6 to 8 hours. Longer waiting times ensure better color absorption.
- Place the bag in a plastic bag to keep it moist.
- Store it in a warm place to help the dye set.
- Avoid moving it to prevent dye from spreading.
Rinsing Instructions
Rinsing the tote bag is important after the dye has set. It removes excess dye and prevents colors from running.
Begin rinsing the bag in cold water. Do this until the water runs clear.
- Rinse each section separately to avoid color mixing.
- Use gloves to protect your hands from stains.
- Wash the tote bag alone during the first wash.
Drying And Finishing
After tying and dyeing your tote bag, drying it properly is important. This step helps set the colors and keeps the fabric strong.
Finishing your tote bag right will keep it looking bright and new for a long time.
Drying Techniques
Air drying is the best way to dry your tie dye tote bag. It prevents colors from fading and fabric from shrinking.
Hang your bag in a well-ventilated area, away from direct sunlight. Sunlight can fade the bright colors you worked hard to create.
- Use a clothesline or hanger to let the bag dry evenly.
- Turn the bag inside out to protect the colors.
- Do not use a dryer; heat can shrink the fabric and dull the dye.
Care Tips For Longevity
Wash your tie dye tote bag gently to keep the colors bright. Cold water helps stop color bleeding.
Always turn the bag inside out before washing. This protects the outside design from rubbing and fading.
- Use mild detergent without bleach or strong chemicals.
- Hand wash or use a gentle cycle in the washing machine.
- Air dry after washing to keep the fabric soft.
- Store the bag in a cool, dry place to avoid mildew.
Creative Variations
Tie-dyeing a tote bag can be a fun and creative process. With the right techniques, you can create unique patterns and designs.
Explore different methods to add your personal touch. This guide will show you how to use rubber bands and stencils.
Adding Patterns With Rubber Bands
Rubber bands help create distinct patterns on your tote bag. They can be used to make lines and circles.
Wrap the rubber bands tightly around the fabric. The tighter the bands, the whiter the lines will be. Experiment with different placements for unique designs.
- Spiral pattern: Twist the fabric and secure with bands.
- Stripes: Fold the fabric and wrap bands evenly.
- Circles: Pinch fabric sections and band them tightly.
Using Stencils Or Brushes
Stencils and brushes give you more control over your designs. You can create detailed shapes and patterns.
Place a stencil over the tote bag and apply dye with a brush. This technique is perfect for adding logos or specific images.
| Tool | Use |
| Stencil | Shapes and outlines |
| Brush | Fill in details |
Frequently Asked Questions
What Materials Do I Need To Tie Dye A Tote Bag?
You need a plain cotton tote bag, fabric dye, rubber bands, gloves, and plastic squeeze bottles. Prepare a workspace with plastic sheets to protect surfaces from stains.
How Do I Prepare The Tote Bag For Tie Dye?
Wash the tote bag without fabric softener to remove sizing. Keep it damp before applying the dye for better color absorption.
What Are Popular Tie Dye Patterns For Tote Bags?
Spiral, bullseye, crumple, and stripe patterns are popular. Use rubber bands to section the fabric and create distinct designs.
How Long Should I Let The Dye Set On The Bag?
Let the dye sit for 6 to 8 hours or overnight. This ensures vibrant, lasting colors on your tote bag.
Conclusion
Tying dye on a tote bag is fun and simple. You only need a few supplies to start. Play with colors and patterns to make your own style. Each tote bag becomes special and unique. This craft lets you express creativity and enjoy the process.
Try different designs and see what you like best. Soon, you will have a bright, colorful bag to use every day. Give it a go and enjoy your handmade art!