
Want to turn a plain drawstring bag into a colorful masterpiece? You’re in the right place.
Tie dye is a fun and simple way to add a personal touch to your bag, making it unique and eye-catching. Whether you’re new to tie dye or looking for fresh ideas, this guide will walk you through every step.
By the end, you’ll have a vibrant, one-of-a-kind bag that’s all yours. Ready to get started? Let’s dive in!

Credit: www.bakerross.co.uk
Materials Needed
Tie dyeing a drawstring bag is a fun and creative project. You need the right materials to get the best results.
This guide covers the key materials you will need before starting your tie dye project.
Choosing The Right Drawstring Bag
Select a drawstring bag made from natural fibers like cotton. These absorb dye well and show bright colors.
Avoid synthetic materials like polyester because they may not hold the dye properly.
- Cotton drawstring bags work best
- Look for light or white colors for vivid dye results
- Check the bag size to fit your dye project needs
Selecting Dye Colors
Choose colors that you like and that will look good together on your bag. Bright and bold colors work well for tie dye.
You can use liquid or powder fabric dyes. Read the instructions on the dye package to prepare them correctly.
- Primary colors: red, blue, yellow
- Secondary colors: green, purple, orange
- Use contrasting colors for a vibrant look
Additional Supplies
Besides the bag and dye, you will need some extra supplies to make the process easy and neat.
These items help protect your work area and help you apply the dye correctly.
- Rubber bands to tie the bag in patterns
- Plastic gloves to keep your hands clean
- Plastic table cover or old newspapers to protect surfaces
- Squirt bottles or spray bottles to apply dye
- Plastic bags or wrap to let the dyed bag set
- Water for rinsing and mixing dye
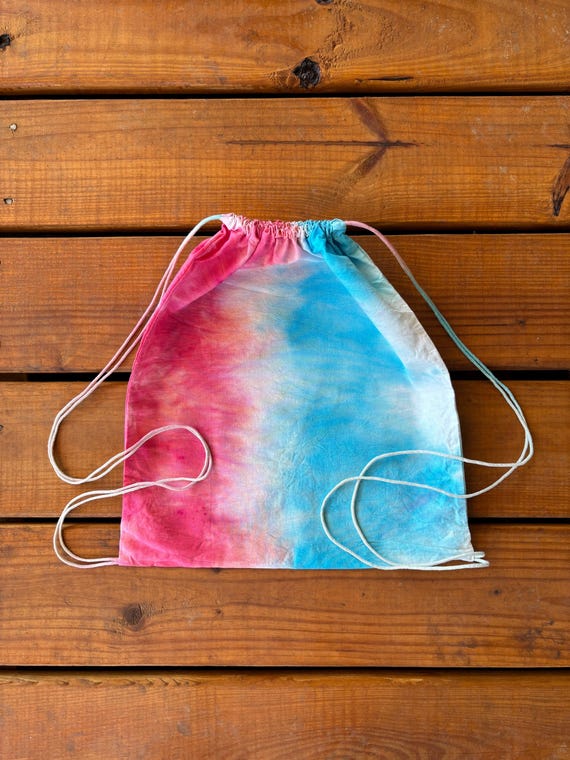
Credit: www.etsy.com
Preparing The Bag
Tie dyeing a drawstring bag starts with good preparation. Clean and set up your bag right before dyeing.
This helps the dye stick well and prevents colors from mixing badly. Let’s look at washing and drying, then setting up your workspace.
Washing And Drying
Wash the drawstring bag to remove dirt and chemicals. Use cold water and mild detergent. Do not use fabric softener.
- Rinse the bag well to clear all soap.
- Dry the bag completely before dyeing.
- Use air drying or a dryer on low heat.
- Make sure the bag is fully dry to avoid color running.
Setting Up A Workspace
Choose a clean, flat area to work on. Cover the surface with plastic or old newspapers to protect it from stains.
- Wear gloves and old clothes
- Keep paper towels or rags nearby
- Have clean water for rinsing
- Use rubber bands for tying the bag
- Place a plastic bag for dye-soaked items
Tying Techniques
Tie dyeing a drawstring bag is fun and easy. The way you fold and bind the fabric changes the pattern. Learning some basic techniques helps you create cool designs.
This guide covers simple folds and binds. It also shows how to use them to create different patterns on your bag.
Basic Folds And Binds
Start by folding your drawstring bag in simple ways. Then, use rubber bands or string to bind parts tightly. This stops dye from reaching those areas and forms the pattern.
- Accordion Fold:Fold the bag back and forth like a fan. Bind tightly with rubber bands along the folds.
- Spiral Fold:Pinch the center of the bag and twist it into a spiral shape. Secure with bands around the spiral.
- Crinkle Fold:Scrunch the bag randomly. Bind with bands in several spots to keep the shape.
- Striped Fold:Fold the bag in long, thin strips. Bind each strip separately for stripe patterns.
Creating Patterns
The way you fold and bind your bag makes different patterns. You can mix folds and binds to get new designs. Here are some examples and the shapes they create.
| Fold Type | Bind Style | Resulting Pattern |
|---|---|---|
| Accordion | Evenly spaced bands | Striped lines across the bag |
| Spiral | Bands around spiral sections | Swirling circle pattern |
| Crinkle | Random band placement | Speckled, mottled look |
| Striped | Separate bands on strips | Bold stripes |
Mixing And Applying Dye
Tie dyeing a drawstring bag is fun and creative. The dye colors bring your design to life.
Mixing and applying the dye properly helps you get bright, lasting colors on your bag.
Preparing Dye Solutions
Start by mixing your dye powder with warm water. Stir well until the powder dissolves.
Use separate containers for each color. This keeps the colors from mixing too soon.
- Wear gloves to protect your hands from stains
- Use plastic squeeze bottles for easy dye application
- Mix small amounts first to test the color
Dye Application Tips
Apply the dye evenly to avoid white spots. Squeeze gently to control the flow.
Work on one section at a time. This helps you keep colors bright and separated.
- Wrap the bag in plastic after dyeing to keep it moist
- Let the dye set for at least 6 hours for strong colors
- Rinse with cold water until water runs clear
Setting The Dye
After tying and dyeing your drawstring bag, you need to set the dye properly. Setting the dye helps the colors stay bright and last longer.
This step is important to avoid the colors fading or running when you wash the bag later.
Waiting Times
After applying dye, let the bag sit for a while. This waiting time helps the dye soak into the fabric.
Usually, waiting 6 to 8 hours is enough. Some people leave the bag overnight for stronger colors.
- Keep the bag wrapped in plastic or a plastic bag
- Store it at room temperature
- Avoid direct sunlight during this time
Heat Setting Methods
Heat helps lock the dye into the fabric fibers. There are different ways to heat set your drawstring bag.
Choose a method that matches the fabric type and available tools.
- Ironing:Place a cloth over the dyed area. Use a hot iron without steam. Press for 3-5 minutes.
- Oven:Wrap the bag in foil. Heat at 300°F (150°C) for 15 minutes. Watch carefully to avoid burning.
- Clothes Dryer:Put the bag in the dryer on high heat for 20-30 minutes.

Credit: www.bakerross.co.uk
Rinsing And Drying
Tie dyeing a drawstring bag gives it a colorful, unique look. After dyeing, rinsing and drying are key steps. These steps help set the colors and keep the fabric strong.
Proper rinsing removes extra dye and prevents colors from bleeding. Drying the bag correctly keeps its shape and color vibrant.
Rinsing Techniques
Rinse the bag in cold water first to stop the dye from spreading. Then use warm water to clean out the remaining dye. Keep rinsing until the water runs clear.
- Start with cold water rinse to lock colors
- Use warm water to remove leftover dye
- Gently squeeze the bag, do not wring
- Repeat rinsing until water stays clear
- Avoid mixing with other laundry during rinsing
Drying Best Practices
Dry the drawstring bag away from direct sunlight. Too much sun can fade the colors. Air drying is best to keep the fabric soft and strong.
| Drying Method | Pros | Cons |
| Air Drying | Preserves color and fabric shape | Takes longer to dry |
| Shade Drying | Prevents fading and sun damage | May take extra time |
| Machine Drying | Faster drying time | May shrink or weaken fabric |
Care And Maintenance
Taking care of your tie dye drawstring bag keeps it looking bright and fresh. Proper washing and storage can extend the life of the colors and fabric.
Follow simple steps to maintain the beauty of your bag and avoid fading or damage over time.
Washing Tips
Wash your tie dye bag gently to protect the colors and fabric. Use cold water and mild detergents designed for delicate fabrics.
- Turn the bag inside out before washing
- Hand wash or use the gentle cycle on your machine
- Do not use bleach or harsh detergents
- Rinse thoroughly to remove all soap
- Air dry the bag away from direct sunlight
Preserving Vibrancy
Keep your tie dye colors bright by avoiding heat and harsh chemicals. Store the bag in a cool, dry place when not in use.
| Do | Don’t |
| Use cold water for washing | Use hot water or bleach |
| Dry in shade or indoors | Dry under direct sunlight |
| Store in a dry, cool area | Store in damp or hot places |
| Use mild detergent | Use strong chemicals |
Creative Variations
Tie dyeing a drawstring bag offers many ways to express creativity. You can explore different patterns and use various materials. These changes make each bag unique and fun to make.
Below are ideas to try with your tie dye project. They help you create original designs and textures. Experimenting with these methods brings new life to simple bags.
Alternative Patterns
Try new patterns beyond the classic spirals. Different folding and tying methods create cool shapes. These patterns add depth and interest to your drawstring bag.
- Accordion fold: Fold the fabric back and forth like a fan.
- Crinkle pattern: Scrunch the bag randomly for a marbled look.
- Stripes: Fold the bag lengthwise and tie with rubber bands evenly.
- Polka dots: Tie small sections tightly to create dot shapes.
- Sunburst: Pinch a spot and tie several bands radiating outward.
Mixing Fabrics
Using different fabrics can change how colors appear on your bag. Natural fibers absorb dye better than synthetic ones. Mixing fabrics also adds texture and contrast.
| Fabric Type | Dye Absorption | Texture Effect |
| Cotton | High | Soft and smooth |
| Linen | Medium | Rough and rustic |
| Polyester | Low | Shiny and slick |
| Rayon | High | Silky and light |
Frequently Asked Questions
How Do I Prepare A Drawstring Bag For Tie Dye?
Start by washing the bag to remove any dirt or sizing. Keep it damp before applying dye for better absorption. Use rubber bands to create patterns and protect areas from dye. Always wear gloves to avoid staining your hands.
What Types Of Dye Work Best For Drawstring Bags?
Fiber reactive dyes are ideal for cotton or natural fibers. They provide vibrant, long-lasting colors. For synthetic bags, use disperse dyes. Avoid fabric paints as they don’t soak in well and can crack.
How Long Should I Let The Dye Set?
Let the dye set for at least 6 to 8 hours. For best results, keep the bag wrapped in plastic and let it sit overnight. This allows the dye to fully bond with the fabric for vivid colors.
Can I Wash My Tie Dyed Drawstring Bag Immediately?
No, wait 24 hours before washing to let the dye set. Wash separately in cold water using mild detergent. Avoid bleach or harsh chemicals to maintain color intensity and fabric quality.
Conclusion
Tying dye on a drawstring bag is a fun and easy craft. You only need a few supplies and some creativity. Each bag turns out unique and colorful. Try different patterns to see what you like best. This project is perfect for beginners and kids.
Enjoy making your bag bright and personal. Keep practicing to improve your skills. Soon, you will have a collection of cool, tie-dyed bags. Give it a try and have fun with colors!


