

Are you tired of spending money on expensive lunch bags that don’t keep your food fresh? What if you could create your own insulated lunch bag that fits your style and keeps your meals just right?
Making your own lunch bag is easier than you think, and it gives you control over the size, design, and insulation quality. You’ll discover simple steps to craft a durable, effective insulated lunch bag that you’ll love to use every day.
Keep reading to unlock the secrets to saving money and enjoying fresh meals wherever you go!
Materials Needed
Making your own insulated lunch bag is a fun project. You need the right materials to keep food fresh and cool.
Choosing good fabrics and insulation makes your bag work well and last long.
Fabric Choices
Pick fabrics that are strong and easy to clean. Outer fabric should be durable to protect the bag.
Inner fabric should be smooth and water-resistant to handle spills and keep food safe.
- Canvas: tough and lasts long
- Nylon: lightweight and water-resistant
- Vinyl: easy to wipe clean
- Polyester: durable and dries fast
- Fleece or cotton for lining
Insulation Options
Insulation keeps your lunch cold or hot. Use materials that trap air and block heat.
Good insulation helps maintain temperature for hours.
- Foam sheets: lightweight and effective
- Reflective foil: bounces heat away
- Thermal batting: soft and insulating
- Bubble wrap: cheap and traps air
Additional Supplies
You will need some extra supplies to finish your lunch bag neatly and securely.
These help with sewing and closing the bag properly.
- Zipper or Velcro for closure
- Thread matching your fabric
- Scissors for cutting fabric
- Measuring tape or ruler
- Pins or clips to hold fabric
- Sewing machine or needle
Tools Required
To make your own insulated lunch bag, you need some basic tools. These tools help you cut, measure, and sew the materials accurately.
Using the right tools makes your project easier and the final bag stronger and more durable.
Sewing Machine
A sewing machine speeds up your work and creates strong stitches. It helps join different fabrics and insulation layers together.
Choose a machine that can sew thick fabrics like canvas or vinyl. Make sure it has a heavy-duty needle.
Cutting Tools
Sharp cutting tools help you cut fabric and insulation accurately. You will need scissors and rotary cutters for best results.
- Fabric scissors for cutting cloth
- Rotary cutter for straight, clean cuts
- Craft knife for trimming small details
- Cutting mat to protect your work surface
Measuring Instruments
Measuring tools help you cut fabric pieces to the right size. Accuracy is key for a well-fitted lunch bag.
| Tool | Use |
| Measuring tape | Measure fabric length and width |
| Ruler or yardstick | Draw straight cutting lines |
| Marking chalk or pencil | Mark fabric for cutting and sewing |
Preparing The Fabric
Preparing the fabric is an important first step to make your insulated lunch bag. It helps ensure the bag looks neat and lasts long.
Choose the right fabric and prepare it carefully before cutting and sewing. This saves time and avoids mistakes.
Cutting Dimensions
Cutting fabric to the correct size is key. Measure twice and cut once to avoid errors. Use a ruler and fabric scissors for straight edges.
Keep in mind the thickness of your insulation layer. Add extra fabric for seams and hems.
- Main fabric: 14 inches by 16 inches
- Insulation layer: 14 inches by 16 inches
- Lining fabric: 14 inches by 16 inches
- Straps: 4 inches by 20 inches (cut two pieces)
- Extra 1 inch added on all sides for seams
Marking Patterns
Marking your fabric helps guide your cuts and sewing lines. Use a fabric chalk or a disappearing ink pen.
Place your pattern pieces on the fabric and trace around them carefully. Mark seam allowances and fold lines clearly.
- Trace the main bag shape on fabric
- Mark seam allowance of 1 inch around edges
- Indicate where straps will attach
- Mark fold lines for bag opening
- Double-check markings before cutting

Credit: www.youtube.com
Assembling The Layers
Making an insulated lunch bag needs careful layering. Each layer plays a special role in keeping food fresh and protected.
In this part, you will learn how to layer fabric and insulation. Then, you will see how to pin these pieces properly before sewing.
Layering Fabric And Insulation
Start by cutting all fabric pieces to the right size. Use one outer fabric, one insulation layer, and one inner fabric for each part of your bag.
- Place the outer fabric on the bottom, face down.
- Put the insulation layer on top of the outer fabric.
- Add the inner fabric on top, face up.
- Make sure the edges line up well.
- Repeat for all parts of the bag.
Pinning Pieces Together
Pinning holds the layers so they do not move while sewing. Use enough pins to keep layers tight but easy to sew.
| Pinning Tips | Reason |
| Pin every 2 to 3 inches | Prevents slipping |
| Use sharp pins | Stops fabric damage |
| Pin perpendicular to edges | Makes sewing easier |
| Remove pins before sewing | Protects your sewing machine |
Sewing The Bag
Sewing your insulated lunch bag brings all parts together. It needs careful stitching for strength and insulation.
Use a strong thread and a sewing machine if possible. Keep stitches even and tight to hold the insulation well.
Stitching The Main Body
Start by sewing the front and back panels of the bag. Place the insulated fabric pieces right sides together before stitching.
Sew along the sides using a straight stitch. Leave the top open for the bag’s opening.
Creating The Bottom Panel
Cut a rectangular piece for the bottom panel. This piece adds shape and strength to the bag’s base.
Attach the bottom panel by sewing it to the main body edges. Use a strong stitch and go slowly around corners.
Attaching Handles Or Straps
Choose handles or straps made from sturdy material. Pin them to the top edges of the bag on each side.
Sew the handles securely with multiple stitches. Reinforce the ends to prevent pulling or tearing during use.
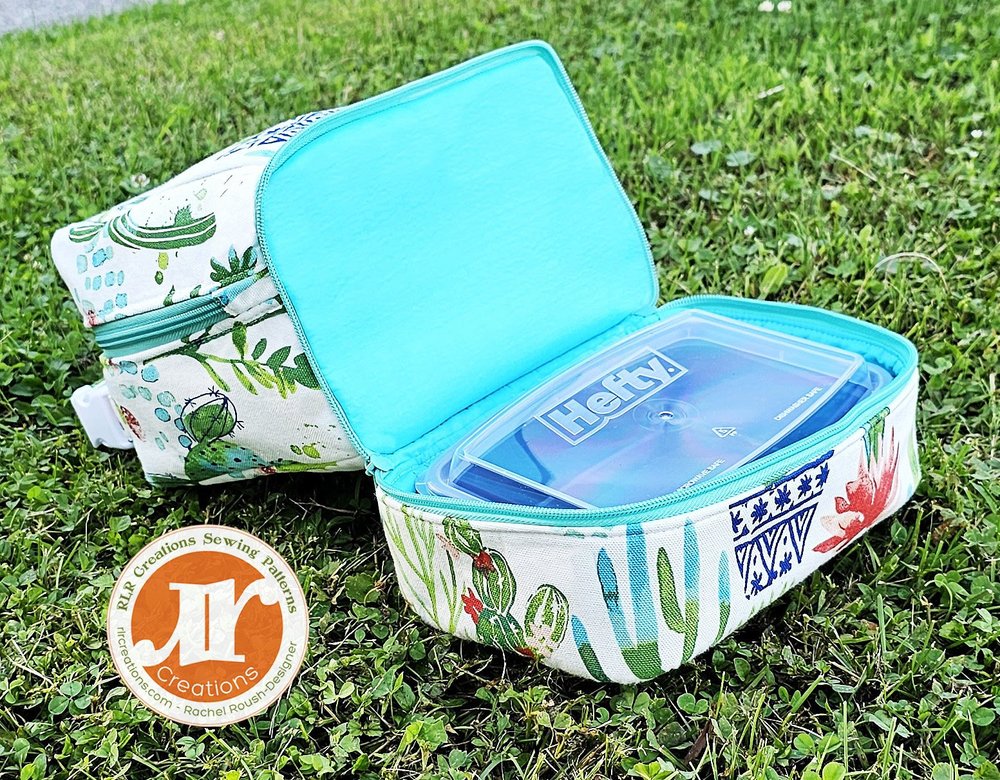
Credit: www.rlrcreations.com
Adding Closures
Closures keep your insulated lunch bag secure and maintain its temperature. You can use different types of closures based on your preference and skill level.
Here, we will explore options like zippers, Velcro, and snaps. Each method has its own benefits and can be easily added to your lunch bag.
Installing Zippers
Zippers provide a tight seal and are durable. They are perfect for ensuring nothing falls out of your lunch bag.
- Choose a zipper that matches your fabric’s color.
- Measure and cut the zipper to fit the bag’s opening.
- Sew the zipper onto the fabric using a sewing machine.
- Test the zipper to ensure it opens and closes smoothly.
Using Velcro Or Snaps
Velcro and snaps are easy to install and adjust. They are ideal for those who prefer a more flexible closure.
| Type | Advantages |
| Velcro | Easy to sew, adjustable |
| Snaps | Quick to open, secure |
Choose Velcro if you want simplicity and ease. Snaps are better for quick access and a clean look.
Finishing Touches
Adding finishing touches to your insulated lunch bag makes it unique. Pay attention to small details for a polished look.
These final steps help your lunch bag stand out. They also ensure durability and style.
Trimming Threads
Trim all loose threads on your lunch bag. This gives a clean and neat appearance.
Use small, sharp scissors for precise trimming. Be careful not to cut the fabric.
- Check all seams for loose threads
- Trim threads close to the fabric
- Inspect inside and outside of the bag
Adding Decorative Elements
Decorative elements add personal flair to your lunch bag. Choose elements that reflect your style.
Consider patches, embroidery, or fabric paint. These can make your bag more fun and personalized.
- Choose colors that stand out
- Use non-toxic materials
- Experiment with different designs
Care And Maintenance
Taking good care of your insulated lunch bag helps it last longer. Clean it regularly and store it properly to keep it fresh.
Proper maintenance keeps your lunch bag free from odors and stains. It also keeps the insulation working well.
Cleaning Tips
Clean your insulated lunch bag after each use. This stops bacteria and smells from building up.
- Use warm water and mild soap to wipe the inside and outside.
- Rinse well to remove all soap residue.
- Let the bag air dry completely before storing.
- For stubborn stains, use a soft brush to scrub gently.
- Avoid bleach or harsh chemicals that can damage the material.
Storage Suggestions
Store your lunch bag in a cool, dry place. Proper storage keeps it clean and ready for your next meal.
| Storage Tip | Reason |
| Keep bag open when not in use | Allows air to circulate and prevents mold |
| Store in a dry area | Stops moisture buildup and odors |
| Avoid heavy items on top | Maintains bag shape and insulation |
| Use a fabric liner | Keeps inside clean and easy to wipe |

Credit: www.youtube.com
Frequently Asked Questions
What Materials Do I Need To Make An Insulated Lunch Bag?
You need insulated fabric, waterproof lining, zipper, thread, and scissors. Choose materials that keep food temperature steady. Insulated fabric is essential to maintain heat or cold inside your lunch bag.
How Long Does It Take To Sew An Insulated Lunch Bag?
It usually takes 1-2 hours for beginners. Time depends on your sewing skills. Cutting and assembling the fabric carefully ensures a durable lunch bag. Practice improves speed and precision.
Can I Customize The Size Of My Insulated Lunch Bag?
Yes, you can customize the size easily. Measure your containers before cutting fabric. Adjust dimensions to fit your daily lunch needs perfectly. Custom sizes enhance convenience and usability.
How Do I Clean And Maintain My Homemade Insulated Lunch Bag?
Spot clean with mild detergent and warm water. Avoid machine washing to protect insulation. Air dry completely to prevent mold. Proper cleaning keeps your lunch bag fresh and functional.
Conclusion
Making your own insulated lunch bag saves money and helps the environment. You control the size, colors, and materials used. This project is fun and easy to do at home. Use it daily to keep food fresh and cool. Small steps like this improve your lunch routine.
Give it a try and enjoy fresh meals wherever you go. Your homemade bag will be useful and personal. Simple, practical, and good for you.


