
Do you want a simple, fun project that helps you keep your child’s toys organized? Learning how to sew a drawstring toy bag is easier than you think, even if you’re new to sewing.
Imagine having a neat, portable bag that holds all those small toys, making cleanup quick and stress-free. In this guide, you’ll discover step-by-step instructions that anyone can follow. By the end, you’ll have a stylish, practical bag that you made yourself.
Ready to get started? Let’s dive in!
Materials Needed
Gathering the right materials makes sewing a drawstring toy bag easier. You can choose fabrics and tools that fit your style and skill level.
Below are the main materials you need, including fabric options, tools, and decorations.
Fabric Choices
Pick a fabric that is sturdy but soft for your toy bag. Cotton and canvas work well because they hold shape and wash easily.
- Quilting cotton: easy to sew and available in many prints
- Canvas: strong and durable for heavy toys
- Linen: natural look with moderate strength
- Felt: soft but less sturdy, good for light toys
- Upcycled fabric: use old clothes or sheets for a unique bag
Required Tools
| Tool | Purpose |
|---|---|
| Sewing machine | Speeds up stitching and makes seams strong |
| Scissors | Cut fabric pieces accurately |
| Measuring tape | Measure fabric for correct size |
| Pins or clips | Hold fabric layers together while sewing |
| Iron | Press seams flat for a neat finish |
| Thread | Matches or contrasts fabric for sewing |
| Drawstring cord or ribbon | Used to close the bag securely |
Optional Decorations
Add fun touches to your toy bag with decorations. These make the bag unique and attractive.
- Fabric paint to add designs or names
- Iron-on patches for a playful look
- Ribbon or lace trims along the edges
- Buttons or beads sewn on for texture
- Appliqué shapes cut from fabric scraps
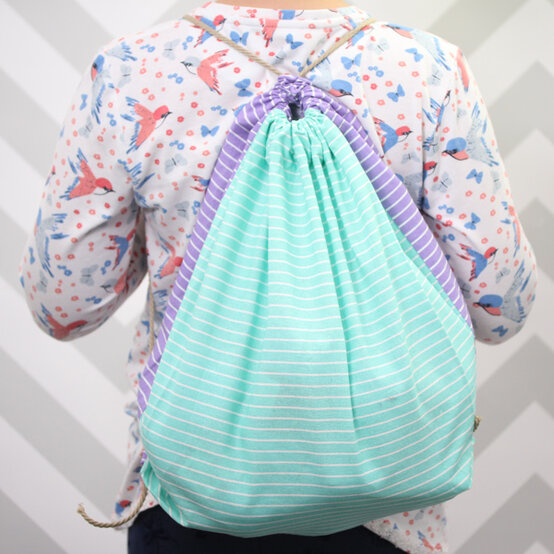
Credit: www.hobbycraft.co.uk
Preparing The Fabric
Preparing your fabric carefully is key to making a neat drawstring toy bag. This process helps you get the right size and shape for your bag.
Take your time measuring and marking to avoid mistakes during sewing. Good preparation saves effort later.
Measuring And Cutting
Start by choosing a fabric that is strong but soft. Use a ruler and fabric chalk to mark the pieces you need. Cut carefully along the lines.
- Measure the width and height of the bag you want.
- Add extra fabric for seams and the drawstring casing.
- Draw straight lines on the fabric using chalk.
- Cut the fabric with sharp scissors for clean edges.
Marking Seam Allowances
Seam allowances are extra fabric edges where you sew pieces together. Marking these lines helps keep your bag the right size.
| Seam Type | Allowance Width |
| Side Seams | 1/2 inch (1.3 cm) |
| Bottom Seam | 1/2 inch (1.3 cm) |
| Drawstring Casing | 1 inch (2.5 cm) |
Sewing The Bag Body
To make the drawstring toy bag, start by sewing the main body. This part holds the toys inside. Use a strong stitch for durability.
Keep your fabric edges even and follow the sewing lines carefully. This helps the bag keep its shape.
Stitching The Sides
Align the fabric pieces with the right sides facing each other. Pin the edges to hold them in place. Sew along the sides using a straight stitch.
- Use a 1/2 inch seam allowance for strong seams.
- Sew slowly to keep stitches straight and even.
- Backstitch at the start and end to secure seams.
- Remove pins as you sew to avoid damage.
Creating The Bottom Seam
After stitching the sides, close the bottom of the bag by sewing a seam across the bottom edges. This seam gives the bag its flat base.
| Tip | Detail |
| Press seams | Iron the bottom seam open for neatness |
| Use matching thread | Keeps stitches less visible |
| Double stitch | Add strength to the bottom seam |
| Check measurements | Ensure the bottom seam matches side seams |
Making The Drawstring Casing
Creating the drawstring casing is an important step in making a toy bag. The casing holds the drawstring securely and lets the bag open and close easily.
This section explains how to fold and pin the fabric, then sew the casing channel correctly.
Folding And Pinning
Start by folding the top edge of the fabric down to create the casing. This fold should be wide enough to fit your drawstring plus extra space for smooth movement.
- Measure the width of the drawstring.
- Add 1 inch (2.5 cm) to the measurement for ease.
- Fold the fabric down to this width along the top edge.
- Pin the folded edge evenly to keep it in place while sewing.
- Check that the pins are secure but easy to remove as you sew.
Sewing The Casing Channel
Sew a straight line close to the folded edge to form the casing channel. Leave enough room for the drawstring to slide inside without catching.
| Tip | Details |
|---|---|
| Use a straight stitch | Helps create a smooth, strong channel |
| Leave an opening | Keep a small gap on one side to insert the drawstring |
| Backstitch | Secure the start and end of your sewing line |
| Test the channel | Slide the drawstring through to check ease of movement |
Inserting The Drawstring
Adding a drawstring to your toy bag makes it easy to open and close. It also keeps toys safe inside. This guide shows how to insert a drawstring neatly and securely.
Follow simple steps to choose the right drawstring material and thread it through the bag. These tips help you make a strong and stylish toy bag.
Choosing The Drawstring Material
Pick a drawstring material that is strong and safe for kids. The material should not fray or break easily. Soft materials are best to avoid hurting little hands.
Cotton, nylon cord, and polyester are common choices. Cotton feels soft and natural. Nylon and polyester are durable and come in many colors.
- Cotton: soft and easy to tie
- Nylon cord: strong and smooth
- Polyester: colorful and durable
- Avoid thin strings that can snap
- Use about twice the bag’s opening length
Threading The Drawstring
To thread the drawstring, start by attaching a safety pin to one end. This helps guide the string through the bag’s casing.
Push the pin through the casing all around the bag opening. Pull the string until both ends come out. Make sure the string moves freely before tying knots.
- Attach safety pin to drawstring end
- Insert pin into bag’s drawstring casing
- Push pin all the way around the opening
- Pull drawstring ends out of casing
- Check for smooth movement before finishing

Credit: sewcraftyme.com
Finishing Touches
Once you have sewn your drawstring toy bag, it’s time to add the finishing touches. These details make your bag look complete and ensure it functions well.
Let’s look at how to secure the drawstring ends and add some fun embellishments to your bag.
Securing The Drawstring Ends
Securing the drawstring ends is important. It keeps the string from slipping through the holes.
You can tie a knot at each end of the string. This is a simple way to stop it from pulling out.
- Use a strong knot like a double knot
- Trim any excess string carefully
- Consider adding a bead for extra security
Adding Embellishments
Embellishments make your bag more unique and fun. You can add them easily with a few materials.
Think about sewing on patches or buttons. They add color and personality to your bag.
- Choose patches that match your theme
- Sew buttons securely to avoid choking hazards
- Use fabric paint for custom designs
Tips For Perfect Results
Sewing a drawstring toy bag can be fun and rewarding. With the right tips, your bag will be both functional and beautiful.
Here are some tips to ensure your drawstring toy bag turns out just right. Follow these simple guidelines for a great sewing experience.
Avoiding Common Mistakes
Common mistakes can spoil your sewing project. Knowing what to avoid can save time and effort.
Check your measurements twice before cutting the fabric. A small mistake can lead to wasted material.
- Ensure your fabric is straight before cutting
- Use pins to hold pieces in place
- Double-check your sewing machine settings
Maintaining Even Seams
Even seams are crucial for a neat bag. Consistency in sewing creates a professional look.
Use a seam guide to keep your stitches straight. This helps maintain the same seam width throughout.
| Seam Width | Recommended Setting |
| 1/4 inch | For smaller bags |
| 1/2 inch | For larger bags |

Credit: www.youtube.com
Frequently Asked Questions
What Materials Do I Need To Sew A Drawstring Toy Bag?
You need fabric, a sewing machine, thread, scissors, pins, and a drawstring cord or ribbon. Choose durable fabric for longevity.
How Do I Measure Fabric For The Toy Bag?
Measure the desired width and height of the bag. Add extra fabric for seams and hems for accurate cutting.
What Is The Best Stitch For Sewing A Drawstring Bag?
Use a straight stitch for assembling the bag. Reinforce stress points with a backstitch to ensure durability.
How Do I Insert The Drawstring Into The Bag?
Use a safety pin attached to the drawstring. Thread it through the casing channel until it exits the other side.
Conclusion
Sewing a drawstring toy bag is simple and fun. You only need basic materials and a few steps. This project helps keep toys organized and easy to carry. Try different fabrics to make unique bags. Practice makes your sewing skills better each time.
Enjoy creating something useful and personal for your space. Keep this easy guide handy for future projects. Happy sewing!